


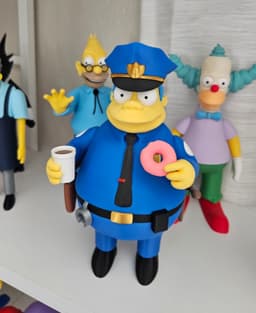


Chief Wiggum
Springfield’s not-so-fearless police chief is ready to join your collection! This multi-part 3D-printable model captures all of Chief Wiggum’s charm. From his uniform and badge to his classic donut-loving stance.
Designed for easy printing and assembly, he’s the perfect addition to your Simpsons lineup. Whether you display him solo or alongside the rest of Springfield’s finest (or not-so-finest), Chief Wiggum is sure to bring some laughs to your shelf.
Dimensions: At 100% scale, Chief Wiggum stands about 8.9 inches (227 mm) tall and 4 inches (102 mm) wide. Scaling up shouldn’t cause any issues, but if you scale down, be mindful that tolerances may become too tight.
Colors Used: Bambu Basic: White, Black, Cobalt Blue (uniform), Cyan (Hair), Silver, Red, Pink, Brown (Gun Holster) Bambu Matte: Lemon Yellow, Dark Brown Geetech Silk: Gold Esun: Gold (not shiny) (Dark Yellow) for the bottom donut
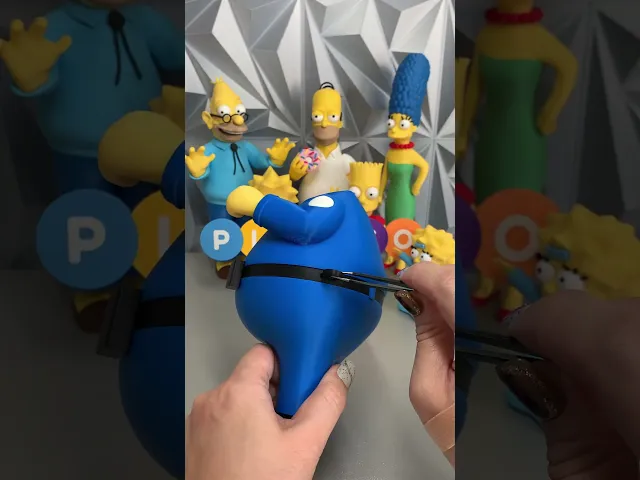
Assembly Tips: Glue the body, belt, and legs together first to ensure a snug fit—this will prevent gaps when adding the other pieces. When attaching the hair, press it in at a slight angle so it slides under the edge of the upper head. This will help create a tighter, more secure fit. For the gun holster, insert the inner black piece with the pin cutout aligned to the holster’s side. Press it all the way down so the pin lines up correctly.
Assembly steps: Attach the body, belt, and legs together, making sure they are glued tightly. Attach the tie, then carefully apply a small amount of glue to secure the tie clip. Glue the badge onto the chest with a small amount of glue. Attach the left and right hands. Glue the white spots onto the arms with the notches facing upward toward the head. Insert the boots, making sure he stands level. Attach the baton ring to the belt, followed by the belt buckle and belt loops on the back. Insert the pins into the belt for the accessories. Build the gun holster: align the black inner piece with the pin cutout, then attach the silver top of the gun, followed by the gun handle. Glue the clip onto the handcuffs. Let it fully dry before attaching to the belt. Attach the hair piece to the head, then build the eyes and attach them to the face. Insert the black bill into the blue hat, add the hat badge, then attach the gold left and right trim pieces. Attach the hat to the head, then connect the head to the body. Add the accessories: the coffee with brown liquid, the donut, and finally the baton and gun on the side.
All done! Chief Wiggum is fully assembled and ready to keep “order” in Springfield (or at least try to). From his badge to his donut, he’s a fun addition to your Simpsons lineup and sure to bring some laughs to your collection.
Thanks so much for building him—be sure to tag @Playco3D if you share your photos, I’d love to see your finished Chief!

Stripe (Gremlins)

Rocko (Rocko's Modern Life)

Chris Griffin (Family Guy)

Ice Man (Mega Man)

Inspector Gadget

Cobra Commander (G.I. Joe)

Waylon Smithers (Simpsons)

Lion-O (Thundercats)

Philip Fry (Futurama)

Rosalina and Luma (Mario Bros.)

Lois Griffin (Family Guy)

Sideshow Bob (Simpsons)

Drill Man (Mega Man)

Cut Man (Mega Man)

Gizmo

Chef (South Park)

Peter Griffin

Officer Eric Cartman

Comic Book Guy
