
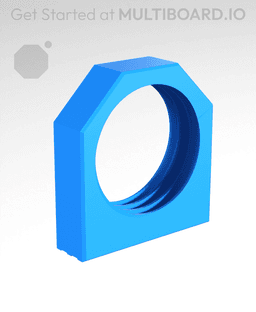

Thread Foot
Use “Thread Feet” and Rods to make your Multiboard stand by itself, it’s an alternative to the Free-Standing Foot.
The advantage of the Thread Foot is that you can extend the length of the rods and make your free-standing Multiboard taller.
To set it up, screw a Big Thread Rod into your tiles, then screw a Thread Foot on both ends of the rod, and finally secure it into place using Big Thread Nuts.
Learn more about this part at https://multiboard.io/knowledge-hub
Printing Guidelines:
The printing orientation is as provided in the file. The print has been designed to be “3 wall perimeters” in wall thickness. Printed at a layout height of 0.2 mm. It doesn't need printing supports. Use the default 15% infill. This part has been designed with a tolerance of 0.25 mm. Your printer will need to be able to bridge gaps of up to 30 mm for some designs.
—
This object is part of Multiboard, a FREE "all in one" organization system with 700+ parts, that combines pegboard holes, honeycomb snaps, Gridfinity like bins, threads, brakes, and much more.
Explore and build the coolest, most adaptable workshop at https://multiboard.io

Print-In-Place Miniature Easel :: Art & Hobby Display Stand

Dagger Dice Weapon
![Cut Banana Halves :: Decorative Pop-Out 3D Wall Art [ The 'Low-Hanging Fruit' Collection ] 3d model](/_next/image?url=https%3A%2F%2Fstorage.googleapis.com%2Fproduction-thangs-public%2Fuploads%2Fenhanced_images%2Fv1%2F49b4b58d-6cea-4a64-a115-a930cb5dbb9b%2FScreenshot_20240920_225722_CapCut.jpg&w=3840&q=75)
Cut Banana Halves :: Decorative Pop-Out 3D Wall Art [ The 'Low-Hanging Fruit' Collection ]
![Cut Lemon + Lime :: Decorative Pop-Out 3D Wall Art Set [ The 'Low-Hanging Fruit' Collection ] 3d model](/_next/image?url=https%3A%2F%2Fstorage.googleapis.com%2Fproduction-thangs-public%2Fuploads%2Fenhanced_images%2Fv1%2F3ae965a7-b50f-4eb5-9bf0-3d34d9cca8aa%2FScreenshot_20240919_011121_CapCut.jpg&w=3840&q=75)
Cut Lemon + Lime :: Decorative Pop-Out 3D Wall Art Set [ The 'Low-Hanging Fruit' Collection ]
![Lemon + Lime :: Decorative 3D Wall Art Set :: The 'Low-Hanging Fruit' Collection ] 3d model](/_next/image?url=https%3A%2F%2Fstorage.googleapis.com%2Fproduction-thangs-public%2Fuploads%2Fenhanced_images%2Fv1%2Ff2b6fe3f-209d-4fe0-889e-9483a7085114%2FScreenshot_20240919_011103_CapCut.jpg&w=3840&q=75)
Lemon + Lime :: Decorative 3D Wall Art Set :: The 'Low-Hanging Fruit' Collection ]

Unifytech - Gridfinity Solder Reel Holder

3D Printed Standing Tissue Box
__202605082110%2520(elegido).jpeg&w=3840&q=75)
Versatile Modular Mini Organizer - Kitchen,Bathroom,Jewelry,Office Supplies,Makeup,Craft Organizer

HO Scale Cleveland RTA Breda LRV (Blue/Green Lines) - Shell and Chassis

Top Force & TA02 Toe-In Knuckles

Ski Boot Tote Handle

12mm Big Bore Spring Adapters – Team Asso RC10 B2 T2 T3 B4 T4 RC10T

1:8 DeLorean Door Locks and Window Guides

1:8 DeLorean Shifter

Nym the Ball Jointed Doll

Ovola Ceiling lamp E27

Dynamic Extraocular Muscle Simulator!

1:8 DeLorean Side Grills

Tamiya ORV Rear Double Wishbone Suspension Conversion

Description suggests going to the website to understand what the part does, but the website linked me here. As a result, I'm having a really hard time figuring out what parts I would need and how much time and material would be involved to get something going.
im in the same boat. the description says use a threaded rod and then two of these and nuts to secure it, but seems a bit much without some sort of understanding of orientation. or HOW you adjust it.
Agreed, links to the specific parts or even the parts-library would be more useful than the knowledge-hub overview. I haven't made this yet, but here's my read on it: