.png&w=3840&q=85)
.png&w=256&q=75)
.png&w=256&q=75)

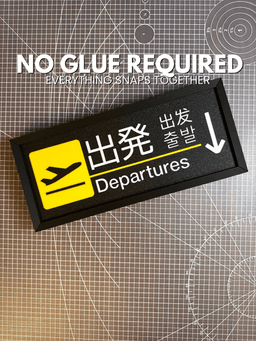
Airport Sign | Departures
Bring the excitement of the terminal home with this 3D printable Airport Departure Sign. Whether you’re an aviation geek, a frequent flyer, or just looking for a sleek piece of modern wall art, this sign captures the iconic aesthetic of international travel.
Get the clock attachment here.
Key Features:
International Vibe: The design features multilingual text options, including English, Japanese, Korean, and Chinese, for an authentic airport feel.
Snap-Together Assembly: No messy glue or external hardware required. Every part is engineered to snap together perfectly for a clean, professional finish.
Versatile Mounting: Includes built-in keyholes in the frame, making it incredibly easy to wall mount. It also looks fantastic sitting on a desk or shelf.
Step-by-Step PDF Instructions: A detailed guide is included in the download to walk you through the assembly process.

Airport Sign | Departures

Box Truck Shelf - Soup Graffiti
.png&w=3840&q=75)
Box Truck Shelf - Blank - Add your own artwork and logo

Money Stack Door Wedge - Hunnid Edition

Money Stack Door Wedge - $10K Edition
.png&w=3840&q=75)
Airport Sign ADD-ON - Clock Attachment
.png&w=3840&q=75)
Customizable Earring Rack & Jewelry Organizer – Display Stand with Catch Tray
.png&w=3840&q=75)
Customizable 3D Printed Poker Deck Box – Sliding Lid Playing Card Case
.png&w=3840&q=75)
Customizable PR Tracker Board – 3D Printed Weightlifting & Gym Display
.png&w=3840&q=75)
PR Tracker Expansion Pack – Extended Barbells & Safety Arms Upgrade
.png&w=3840&q=75)
PokeCenter TCG Sleeve Dispenser – Top Loader & Card Slab Storage
.png&w=3840&q=75)
PokeCenter Double Deck Box – Magnetic TCG Playing Card Storage
.png&w=3840&q=75)
PokeMart TCG Sleeve Dispenser – Top Loader & Penny Sleeve Organizer
.png&w=3840&q=75)
3D Printed Sushi Bento Box Magnet Set – Cute Fridge Decor
.png&w=3840&q=75)
Weight Plate Magnet Set (with customization guide)
.png&w=3840&q=75)
Free - Weight Plate Magnet Set
.png&w=3840&q=75)
Mickey Mouse Middle Finger Wall Hook | Screw-Together Assembly | Cartoon Fan Art
.png&w=3840&q=75)
The Desk Set - Paper Clip Container
.png&w=3840&q=75)
The Desk Set - Sticky Note Container
.png&w=3840&q=75)
The Desk Set - Pen Holder
.png&w=3840&q=75)
OK, just to be sure, there are 14 parts that each should be exported and individually printed correct?
Thank you.
Both the signs (with and without arrow) contains 3 parts and then the frame and connector pieces for a total of 14 yes. The files have been updated with the STL version of each part to make things easier for you though as well
I've uploaded my make, which I am happy with. It would be nice to have another version that allows for the sign to be printed using the m600 filament swap by layer. Right now, with the embossed portions of the sign, I am not sure how I can do that except to print parts separately and glue or hand press them together. Despite that, I really like this, given 20 years of traveling through SE Asian airports.
Can I please have an STL version of each part? The 3MF makes it difficult to figure out individual parts.
On the slicer you can export each part as an STL by right clicking the part and hit "Export as one STL"