


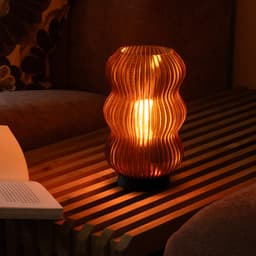
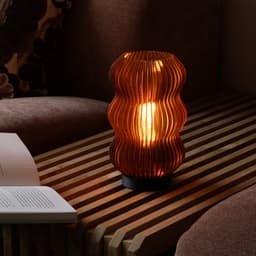
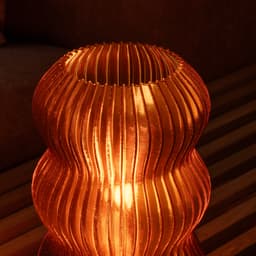
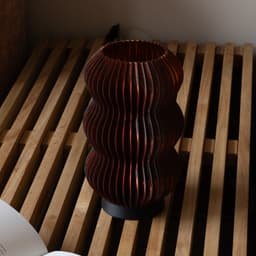

WAVY Lantern Lamp - E26/E27 socket compatible
WAVY has a soft, flowing shape with three full segments that follow one another. A fine wavy line pattern runs across the whole lamp for a lively, organic look. The design is inspired by a classic lantern, but with a playful twist. When the lamp is on, warm light shines through the ribs and you get a soft, cozy glow. When the lamp is off, the wavy pattern stands out beautifully and WAVY sits there as a calm design object. A warm eye-catcher that brings a cozy feel to your space.
Specs
- Base: 8.8 x 3.3 cm (DxH)
- Cap: 7.4 x 5.3 cm (DxH)
- Shade: 13.7 x 20.6 cm (DxH)
Resizable: no (resizing will affect the fit of the E26/E27 socket) 3D Model Type: Shade: solid body (vase mode only) | Base: shelled body (normal print) Materials: PLA, PETG (for shade) Print difficulty: moderate
What you need E26 or E27 lamp socket with screw rings, lamp cord with plug, LED bulb (LED only).
Note: the hole in the base is designed for a regular oval cable. If your cable has a different diameter, let me know in the comments.
Assembly instructions The lamp consists of three parts: a base, a cap and a shade.
- Feed the loose cord (without socket attached) through the hole in the base from outside to inside.
- Wire the socket to the cord according to the manufacturer's instructions.
- Make sure only the bottom ring is mounted on the socket.
- Place the shade loosely on the base.
- Feed the socket through the shade and secure it to the cap with the ring.
- Attach the cap and socket to the base by twisting it tight, clamping the shade in place. Make sure there is no tension on the cord, as it will move slightly while twisting.
No screws or glue needed, which makes WAVY relatively easy to assemble.
Print settings — shade (vase mode) Nozzle diameter: 0.8mm or larger Layer height: 0.3 - 0.5mm Layer width: 0.8 - 1.2mm Print mode: vase mode (spiralize outer contour) Perimeter speed: 20 - 35 mm/s Note: when using Cura or Bambu Studio, disable 'smooth spiral' for best results.
Print settings — socket base and cap (normal mode) Nozzle diameter: 0.4 - 0.6mm Layer height: 0.25 - 0.3mm Layer width: default Bottom and top layers: 4 Infill: 40% Walls: 3 Outer wall speed: 20 - 35 mm/s Supports required: no Base orientation: bottom down Cap orientation: flat top side facing the bed
WAVY Lantern Lamp - E26/E27 socket compatible

Vase INÈS - Minimalistic Vase with Playful Touch

Vase FELICE - Playful Vase with Soft Pleats

Vase SANDRA - Round Textured Vase

Vase ARC - Playful Flower Vase

HEART Vase for Glass Inserts - 2 Sizes

Vase BEAU - Playful Japandi Vase

Vase CLAIRE - Elegant Vase with a Playful Twist

Vase GABY - Playful Curved Vase

Vase SENNA - Playful Flower Vase

CUBIC Clock - Gyroid Table Clock

Vase LUZI - Geometric Design Vase

Vase ORION - Modern Zig Zag Vase

Vase ORIANNA - Playful Sculptural Vase

Modular Vase - CONCEPT 1

Vase SUJI - Geometric Origami Vase

Vase VERA - Elegantly Curved Vase

Vase TIDE - Wavy Cylinder Vase

Geometric Lantern Lamp ONYX - E26/E27 socket compatible

Vase COCO - Playful Organic Vase
