


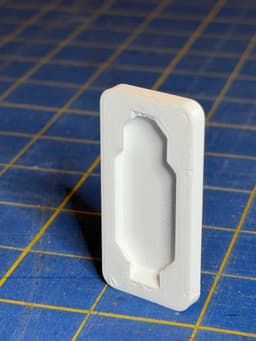


Multipoint Rail Snap-in Slot - Negative
Multipoint Rail Slot Remixing Negative part to create a snap-in slot for a 2 MU Multipoint Rail. Follow the Remix file instructions to remove the slot from your part. I included a STEP file if you need to Remix the Remix. I lengthened the slot at the top and shortened the overall length adding retention edges at the bottom.
Slide the top of the Multipoint Rail into the slot and slide all the way in. Then apply pressure at the bottom to snap it into place. Part can be removed from the rail by pulling down and prying out from the bottom. There is an opening at the bottom to get a flat screwdriver into the slot to help pry the rail out. If you have an attachment that cannot be removed from the board, ensure the pry slot extends out of the bottom of your part so you can get a screwdriver in behind the part.
There is likely a better way to add a more secure attachment to some parts, but it is easier to print the part and the Peg Click Rail separately and then attach to a Multiboard or regular peg board.
I have not tried printing a Multipoint Rail onto the part, but I don't think it would be flexible enough to slide into the slot to allow it to snap in at the bottom.
Multipoint Rail Snap-in Slot - Negative

Multipoint Rail - Rail Slider

Multipoint Rails - STL Remixing Files

Multipoint Rail - Flex-On Rail Slider

8L Screw-On Mount - Multipoint Rail

2L Screw-On Mount - Multipoint Rail

4L Screw-On Mount - Multipoint Rail

3L Screw-On Mount - Multipoint Rail

6L Screw-On Mount - Multipoint Rail

5L Screw-On Mount - Multipoint Rail

7L Screw-On Mount - Multipoint Rail
.png&w=3840&q=75)
Pegboard Click - Multipoint Rail (Supported)
.png&w=3840&q=75)
Pegboard Click - Lite Multipoint Rail (Supported)

Pegboard Click - Lite Multipoint Rail (Folded)

4L Screw-On Mount - Multipoint Rail Rings

8L Screw-On Mount - Multipoint Rail Rings

2L Screw-On Mount - Multipoint Rail Rings

3L Screw-On Mount - Multipoint Rail Rings

6L Screw-On Mount - Multipoint Rail Rings

5L Screw-On Mount - Multipoint Rail Rings
