


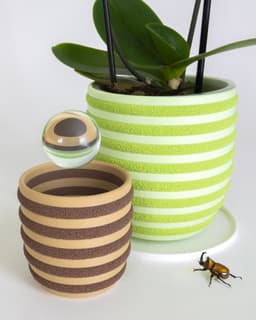


WALDO Planter 02 (80mm)
The WALDO Planter combines simple filament swaps and multi-texture printing to deliver a bold 3D print worthy of your houseplants.
This planter is ~120mm tall and 120mm in diameter. The download also includes a matching drip tray and lid.
Printing Guidelines
-
3MF files for Bambu Studio/Orca and Prusa Slicer are included with the multi-texture settings already applied, but I still suggest you review the settings and slicer preview to make sure everything looks right for your setup
-
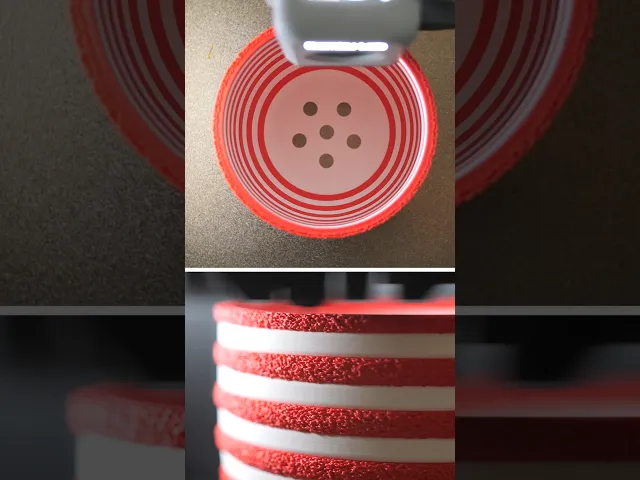
Combine 'Main' and 'Fuzzy' parts to print together. 'Main' prints with standard settings (0.16-0.2mm layer height, 2-3 perimeters, 5 top layers, 0.4mm outer wall width). For the 'Fuzzy' part enable Fuzzy Skin on 'Contours/Outer Walls only' with point distance of '0.5mm' and thickness of '1mm' (or as you prefer).
Importing STLs as multipart models
-
For Bambu Studio/Orca Slicer, drag both files into the slicer together and select 'Yes' to the prompt 'Load these files as a single object with multiple parts?' Now you can individually modify parameters under the 'Objects' setting tab.
-
For Prusa Slicer, ensure that you are in 'Expert Mode'. First, import the 'Main' body, then right click on the name in the lefthand parts list, and click 'Add Part>Load' to add the 'Fuzzy' body. Now you can right click that part in the same list and go to 'Add Settings' to add 'Layers and Perimeters > Perimeters' + 'Infill > Fill density' + 'Fuzzy Skin > Fuzzy Skin + Fuzzy skin point distance + Fuzzy skin thickness'. That will add the ability to adjust those settings individually.
I also made a video about the process
Multicolor on Single Color Printers
In addition to the multi-texture effect, you can add a pause between each stripe within your slicer for a color change. This can be done with an AMS/multi-color filament system, or manually (filament swap/pause option available within most slicers). The included split color 'Prusa Slicer' 3MF models already have pauses inserted, while the 'Bambu Studio' 3MF files are set up for use with Bambu AMS. No Prime tower required!
Photographed model was printed on the Bambu Lab X1-Carbon 3D Printer using Bambu Matte PLA Desert Tan and colorFabb stoneFill Red Brick*
These affiliate links give me a commission on sales at no additional cost to you. Thanks for supporting Make Anything!.
WALDO Planter 02 (80mm)

Mailbox Indicator Flap // Spider

Clover // Flatland Keychain Magnet

Starburst // Flatland Keychain Magnet

Mailbox Indicator Flap // Raccoon

Mailbox Indicator Flap // Fuschia Flower

Drill Mixer // Stirring Stick

Super Plunger // Sink and Shower Drain Plunger

Palpa Hummingbird

Nazca Condor // Líneas de Nazca
75mm PERSPEKTIVA Cube

Raindrop Cup Top

Fuzzy Stripes Planter // 90x60mm

Awesome Blossom // Rejected Animals Decal

Great Wide Shark // Rejected Animals Decal

Cloud // Flatland Keychain Magnet

Tsugite Cube 3x3 Puzzle (Version A)

Puddle // Flatland Keychain Magnet
Tsugite Cube 2x2 Puzzle (3 sizes)

Dastardly Dovetail Box (Round Magnetic)

Hi, I recently found you and started following you. I also recently started 3D printing. To kick things off, I bought an Ender 3 S1 Pro and am using the latest CURA. If I go well, I'll later buy a more recent Bambu or Creality printer with Klipper. From my perspective, it would be great to have your tutorials that include the processes and settings needed for CURA. Anyway, I want to congratulate you on your work and ingenuity in making these things in 3D... Sincerely, Miguel from Argentina.