


Collapsing Scottish Claymore
William Wallace - Scottish Claymore Replaceable Blade Version
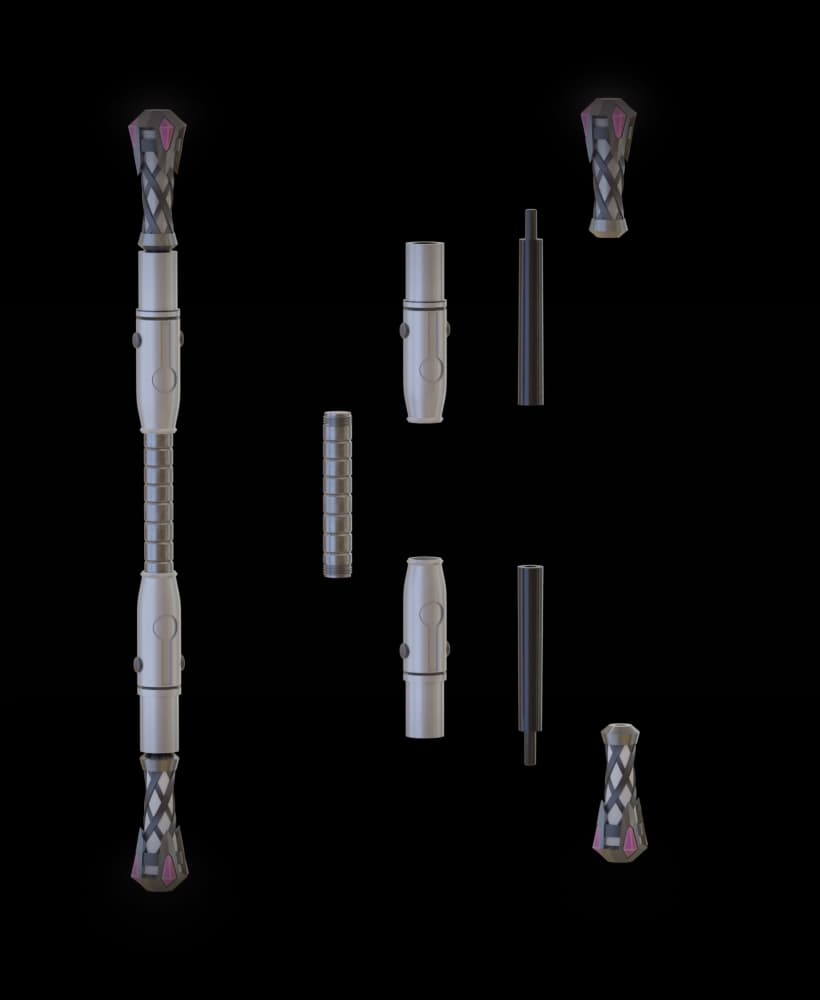
This is my take on a collapsing William Wallace’s Scottish Claymore. Not only is it ridiculously large but I also added another blade segment so it extends extra far. The tallest part is 300mm as printed but it extends to 1530mm lg!
This is the replaceable blade version, if you want a print-in-place version it can be found here.
Printing I have detailed instructions on how to print collapsing swords on my website.
Test Print The test print is a total of 24mm high so I change retraction settings every 8mm. Then I compare the changes until I achieve the best result. Each printer is going to be different but in my case I used a negative “extra restart” distance to reduce the size of the layer seam.
Printed on the Muldex rep-rap IDEX printer.
Other Collapsing Swords Master Sword Katana Jian Broad Sword Dagger
Note: Assembly model for reference only.
Having troubles printing or want to show off your prints? Join our Facebook Group.
Collapsing Scottish Claymore

Not So.. XL Highland Cow (standing) for smaller build plates below 300x300x300

Not So XL Highland cow (sitting)

XL Highland Cow (standing) for larger build plates above 300x300x300

XL Highland Cow (sitting)

Print-In-Place Miniature Easel :: Art & Hobby Display Stand

Destroyed Apartment Buildings

REALISTIC TEXTURED SCOTTISH HIGHLAND COW – COZY WINTER EDITION / HOMEDECOR / BISON
Marvel Rivals Gambit Collapsing Staff

Destroyed Apartment Buildings - 8, 12 and 16 Storey

Comically Small Collapsing Saber! - Free for a limited time!

Cherub Cow

Crushed Bottle Artist’s Catchall – 3D Printed Acrylic Paint Tube Holder (Sculptural Studio Organizer

Tiger statue.stl

Zhar’kul of The Infernal Brood

West Highland Terrier Cookie Cutter STL File - 4 inches

West Highland White Terrier Cookie Cutter & Stamp Set, Dog Shape, Perfect for Cookies & Fondant, 3 Sizes PRODUCT_279

Medieval Sword Stamp Tile Set, 5 Sizes, Perfect for Clay & Cookies, Blade & Dagger Designs, Antique War Motif PRODUCT_1705

Blade Shape Cutter & Stamp, Cookie Fondant Tool, Medieval Sword Cutter Set, 3 Sizes, 6 Pieces PRODUCT_1268

West Highland White Terrier Stamp Tile Bundle, 5 Sizes for Clay, Cookies & Fondant, Perfect Dog, Pet, Animal Motif PRODUCT_2004

I'm having trouble with the the pommel cap not fully lining up when I screw it on any suggestions?
having this same issues but i see there is no reply
Too Tight? • Reprint the pommel with the cap just below the bed surface in your slicer to allow it to rotate more. • Reprint the pommel scaled up slightly. • Tighten the pommel really tight, wait a day to allow the plastic to creep and loosen. Tight it again and repeat until it lines up.
I guess 84% scale across the board would be okay? (270mm build height) (with vase mode blades). No wait... 90.71% without pommel cap. :) :)
Do I print blade 1 (the tip of the blade) in vase mode?
i would print all blades in vase mode. for blade one i would turn both layers on, and then for the rest turn bottom and top layers off. it creates a much stronger blade, with no z seam.
I completed the hilt, it’s in great condition. What about the blades, I print them in vase mode/individually correct?
Thank you
Any recommendation for infill etc…?
I completed the hilt, it’s in great condition. What about the blades, I print them in vase mode/individually correct?
The weakest link is normally the blade, 3 wall 15% should be plenty good enough for the hilt.
is there any way to get 3 wall blades for a lot more strength? i know the step downs would be bigger and the final blade would end up smaller. just curious
You could scale it up. Ha Ha
How do I fix the problem where the blades print fused together?
I agree with quilixxcze, or tune your layer seam using the test print.
Try to print it in "vase" mode. Every blade as standalone =)